Despite having a large number of TV channels available nowadays there are often evenings when I can find nothing which I'd like to watch so I often resort to the laptop and either Pinterest or YouTube. This card is more or less CASE'd from a YouTube video in which a square acrylic block was used to produce an inky background - these backgrounds are quite unpredictable and certainly cannot be replicated exactly another time but great fun nonetheless! As I don't have a square block I die cut a mask from paper and printed through the 'hole'. First of all a couple of colours of ink pad are selected and applied to the block as you think best, spritz lightly with water and then print onto your chosen piece of white card. My piece of card was slightly smaller than a 6" card blank but with hindsight could have been a bit smaller so that I could have added a toning coloured layer behind. Once this ink was dry I used the Misti to stamp a sentiment, the tree and a flight of birds before using a square die slightly smaller than the inked square to cut out the centre. The white layer was adhered direct to the base card and the cut out square inserted into the square 'hole' using foam pads to raise it up. The eagle-eyed amongst you will have spotted the small area behind the birds where some of the ink leaked outside the makeshift paper stencil but I decided that just added to the interest and unpredictability of this great technique (that's my story anyway!!). I can think of quite a few stamps which would work well using this technique.
Stamp - Sheltering Tree from Stampin' Up
Sentiment - from the same stamp set
Birds - from High Tide stamp set Stampin' Up
Tuesday, 1 May 2018
Monday, 30 April 2018
Workshop
On Saturday I attended a great Stampin' Up workshop organised by the lovely Jill. We received a stamp set with four small ink pads and a very comprehensive set of instructions for no less than eleven projects ranging from small boxes to cards, all using the same stamp set. This is a good way of getting to know various ways in which stamps can be used to good effect and I came away with lots of ideas. I managed to get most of the projects done on the day but this is one of them which I decided to finish at home having thought I'd like to emboss the top layer of white. There are two layers of white card and a 'gap' is cut into one of the layers and the flowers are stamped onto the bottom layer filling the 'gap'. Another flower and some leaves were stamped and fussy cut to add once the card was assembled. Sentiment was stamped before embossing the top layer. I expect you will be seeing some of the other projects at some point so watch this space!
The original idea for this 'split' card apparently came from Old Stables Crafts where I imagine you can find how it was made. I'm certainly aiming to check out this link when I have some time to spare.
Stamps - Painted Harvest Stampin' Up
Colours - Daffodill, Pumpkin Pie, Crumb Cake and two greens for leaves
Sunday, 29 April 2018
Pixie Snippets challenge #325
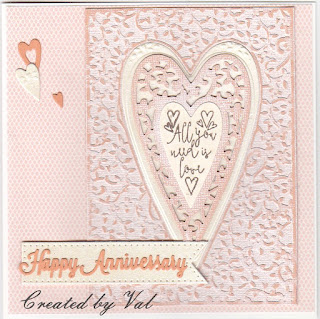
It is time to visit the Playground again for the fortnightly challenge and this time I'm taking along a card made to fill a gap in the Anniversary section of my box. I've used a set of dies which also has a matching embossing folder and some stamps and apart from the base card and a piece of patterned paper everything else uses snippets of card in toning colours. The embossed panel was cut from some card which has a 'whitewash' effect on one side and a darker plain colour on the reverse and once embossed it was sanded lightly to emphasise the design. Some snippets of cream pearl card also came into use for some of the hearts and the banner. One of the stamps was used on the centre heart and three of the tiniest hearts were scattered onto the background. Die cut words onto a cream banner and that's it, a simple anniversary card.
As always there is a great prize on offer this fortnight and Di has made a card to showcase this and again there are the usual helpful hints on how it could be used - well worth popping along to take a look and maybe making something using up some of your own snippets.
As always there is a great prize on offer this fortnight and Di has made a card to showcase this and again there are the usual helpful hints on how it could be used - well worth popping along to take a look and maybe making something using up some of your own snippets.
Dies and Embossing Folder - Tonic
Banner - Sue Wilson Die
Wording - Crafter's Companion dies
Subscribe to:
Comments (Atom)


