
Sunday, 6 September 2015
Festive Beading
I've just spent two days demonstrating beading - this time it was beaded 'covers' for Christmas baubles and I've made so many different ones I just might have to actually have a tree this year!! Here are just a few of them and I will try to take some more photos soon to share the others and also some stars and 'dangles' which should also look good on the tree. They aren't the easiest thing to photograph but I guess you can get the idea even though they are hanging from a mug tree - a lucky charity shop find.


Tuesday, 25 August 2015
Birthday Card
I was trying to think of something a bit different as a birthday card for a great niece who is six, mainly because I have no idea what sort of things she likes. I just hope she is aware of the Roald Dahl books because I decided to make a card based on James and the Giant Peach, printing all the separate elements using Craft Artist before assembling them in the usual way. I've made a personalised insert with some faded out images on the same theme.


Sunday, 23 August 2015
Pixie Snippets Challenge 191
I've managed to make a card for the Pixie Snippets challenge this week and apart from the background everything else was made using snippets from the bits boxes. The background was Centura Pearl card embossed using a lovely folder which was actually a freebie (again) which came with two sentiment stamps as well - couldn't resist!! After embossing I rubbed some amethyst gilding wax over to bring out the design, then simply die cut the rest of the elements and stamped one of the free sentiment stamps.

Background - free embossing folder with amethyst gilding wax
Sentiment - stamp which came with free folder
Shaped layers - Sue Wilson Greek Island dies
Flowers - Britannia flower dies
Leaves - Crealies die

Background - free embossing folder with amethyst gilding wax
Sentiment - stamp which came with free folder
Shaped layers - Sue Wilson Greek Island dies
Flowers - Britannia flower dies
Leaves - Crealies die
Saturday, 22 August 2015
Oriental Theme
The stamps used on this card were from a set given away recently on the front of a magazine. I think they must have been designed by Crafter's Companion (although it doesn't say so) because they seem to go so well with the papers and other items in their Kimono range so I've printed one of their papers to use as a background. Images coloured using Copic pens. I'm soon off to venture out into the jungle garden to attack the grass and I'm hoping there are no wild animals lurking!!

Stamps - free from magazine
Backing Paper - printed from Kimono CD Crafter's Companion
Sentiment - Stampin' Up

Stamps - free from magazine
Backing Paper - printed from Kimono CD Crafter's Companion
Sentiment - Stampin' Up
Wednesday, 19 August 2015
It's Been a While ...
...since I actually made a card - over a month in fact when I made four family birthday ones for July birthdays. I do have quite a stock of cards made and really don't need more at the moment but I found I was missing making them; of course my stamps and dies are lying neglected and my huge collection of paper and card unused!! Today I've produced two after dithering about trying to decide what to make and what to use because I'm so out of touch. This one would be suitable for a crossword enthusiast male or female and details of products used are below.

Background - Papermania paper with an oddment of raffia
Crossword - Docrafts stamp with greeting hand written
Clock Face - part of a stamp by Chocolate Baroque

Background - Papermania paper with an oddment of raffia
Crossword - Docrafts stamp with greeting hand written
Clock Face - part of a stamp by Chocolate Baroque
Tuesday, 18 August 2015
Another Zipped Pouch
I thought I'd just as well show you the third variation of the pouches I made at the weekend - this time I went for a flat one (same basic method with a change in the way it was folded before stitching the final seams). I thought this sort of thing could be handy for maybe travel documents or even a way of keeping all the general bits and pieces together inside a larger handbag so that if you wanted to change bags easily all you need do is just swap the pouch and its contents. This pouch is approximately ten inches square but could of course be made any size you like.
I've had quite a long break from making cards but now I'm feeling as if I want to get back to it so maybe there will be some more things to share shortly.

I've had quite a long break from making cards but now I'm feeling as if I want to get back to it so maybe there will be some more things to share shortly.

Monday, 17 August 2015
Two Days Running
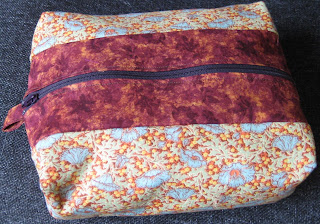
Well another blog post today - this time to show you a picture of the zipped pouch which caused me the problems. It was meant to be like the one I showed you yesterday but due to the problems fitting the zip (which was exactly the same length as the bag) I had to abandon the original idea and add some extra strips of fabric to the zip before inserting. As I said this changed the shape and size of the item but I'm sure it is usable for something or other and I was determined not to waste either the fabric or the time spent working on it. I've also made another one using my one remaining long zip and I will show you a picture of that one some time - a different style using the same method.

Subscribe to:
Posts (Atom)